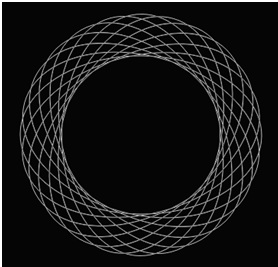
Simple Circle Spirograph
Simple Circle Spirograph
Here we have another Photoshop tutorial for you, and this one is going to be relatively straight forward and simple but we think you will enjoy the end result. Remember these Photoshop tutorials are aimed towards everyone and we try and make the content as friendly as possible and the steps and diagrams as easy to follow as we can.
Step One – Getting Started
Right then let the fu begin. Firstly we are going to need to open Photoshop and create our document. We are going to start by firstly creating a 2000×2000 pixel document and this is going to be on a completely black background. You will find out later why it has to be black.
Step Two – New Layer
So now we have this great black background we need to add some stuff to it. Therefore to begin with we will need to add a new layer. On this layer we now need to at a shape, and due to the nature of this circle Spirograph tutorial we will be using the Ellipse tool. Remember with the Ellipse tool you can hold down shift whilst drawing the circle and this will then make it a perfect circle.

Step Three – Free Transform Tool
Now that all this is done and you have your perfect ellipse in the middle of the black background, now is when we have a little fun. What you need to do now is simply switch back to the Move Tool, the symbol is a (V), once back to this selection you need to activate the Free Transform Tool. There are two different way of doing this; Firstly you can click Ctrl and T or you can go into the edit tab and select the Free Transform option.
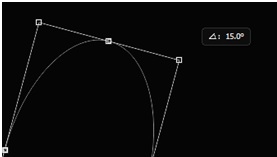
Step Four – Rotation to 15° Increments
As you can tell we now have a entire black canvas which holds just a perfect ellipse in it, which from the previous step should have the Free Transform Tool selected on it also. What you need to do now is simply grab the outside of the transform box whilst holding down shift, this will keep it straight. After grabbing the outside of the transform box you need to rotate it to 15° Increments. Once this is done simply hit enter to apply these transformations.
Step Five – Using a Hotkey
You’ve probably already guessed that the previous step needs to be repeated several times, and if you did then you my friend are correct. But don’t worry we don’t expect you to go through all that again and neither does Photoshop because there is a very clever Hotkey that you can use. Essentially what will be happening is that you will be duplicating and rotating the object until it forms a full circle. The way to do this quickly and effectively is by switching back to the move tool and pressing Ctrl Shift Alt T repeatedly until you get a perfect circle.